TADA! Can you guess what it is? I was very proud of myself, this cover was made by my hands, I took pices of chipboard cut to the dimensions that I wanted, and then adhered to a beautiful shopping bag that I received from a LSS when I purchased supplies months ago (I recycle everything, that how I ended up with the ever so enduring nickname "Little Indian" from my husband). Also, the cool thing about this..... It has a plastic cover on it, to protect it from getting ripped, beat up in my purse, and wet (any guesses as to what it may be?) How about another clue:
Any guesses? Okay I'll just tell you! I made my own planner! This is what it looks like when I open it
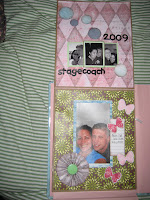
On the right side is the organizer, and the left side, is a mini brag book - primarily because people always ask me about my husband, want to know what he looks like, you know the drill. And I never have photos! Cardinal sin of a scrapbooker really. Here is what the left side looks like
Really it is a six page mini album incorporated into my Day
I planned it so that when you open it, you get a whole month view for the year, where I can put special dates, vacations, etc. Once you flip through that, before you get to the weekly spread, you get this page to the left. It has holes I cut into it, where I slipped a split pack of sticky notes, and some place markers. Very useful for a day planer may I add. I got the idea from Kathy Orta, she has a tutorial on her Ustream, but the sample item is found here.
After this little holder page, you come to the weekly planner part. I created the planner pages and printed them at home after looking at several examples and picking out what would and would not work for me and then combining what would work for me. Each week is a two page spread - the left side is the date/appointment keeper, and the right side is a to-do list style for each day of the week. I also have places to put notes. Jot things down whatever.
And this everyone, is my super awesome day planner. Overall dimensions are made to fit 8.5x11 pages - which is what my planning pages are. The mini book on the left side is slightly smaller in order to fight nicely inside. The overall book dimensions are 9 W x 11.5 L x 1.5 D. And honestly, the only thing that I can say is that this planner rocks, and I am so proud of myself for making it entirely with my own two hands. Scrapbooking Industry 2, Scrapbooker 1, Day Runner Company 0.
Again, if you want tutorials, love what you're seeing, leave some love and let me know! I always appreciate comments, they warm my little beating heart!
Supplies: DCWV, Tim Holtz, Chatterbox Inc (Patterned Paper); Bazzill (Cardstock); Martha Stewart Scoreboard; EK Success, Stampin Up!, Spellbinders Labels and Nestabilities (Punches, labels); Stampin Up! Butterfly Prints (Stamps); Basic Grey (Rubons); Me and My Big Ideas (Dimensional Embellies); Binding (Zutter)


Oh Paula this is great really great I would love a tutorial on this. THis would be great for school and business all in one! You are my hero!!
ReplyDeleteadorable and love the colors! What a fun hop it’s been! Thanks for joining me today on the Handmade Holiday Blog Hop! I really appreciate your visit
ReplyDelete