

Monday, July 30, 2012
Summer Cool Treat Pin Cushion
Not too long ago, as the reward for a quarter well done, I went to Joanns to just shop. While there, I stumbled upon these super cute glass dishes that were on clearance, and I thought they would make the perfect little pin cushions. The best part of it was that the dishes with the additional 20% off my entire purchase coupon I had only cost about 50 cents a piece, so I bought what I could find. That was months ago to be honest with you and they have been sitting around until occasion called for them, and well, occasion called a few days ago. Here is my little project:
 Is it not the cutest thing ever? I really wanted this one to be a little more on the simple side, the last one I made was very extravagant. I thought simple would make it more ice cream coney. I know it doesn't have any pins in it yet, but I just love the way that it turned out!
Wednesday, July 18, 2012
Mixed Media Album Swap
As some of you know, I write over at Scrapjazz.com. A while back, I wrote an article on how to upcycle your packaging, and I had created a wonderful mini album out of all the scraps and bits and pieces left on my desk from various projects. One of my dear scrapping buddies, Virginia, over there loved the article so much she wanted to do a Mixed Media UpCycle Mini Album swap, and I of course was very excited about this. Virginia and I have been swap partners once before and I really enjoyed what she made, so I have been eager to swap with her again. For this mini album, everything in it had to be upcycled materials, include pockets, fabric, and use the Jillbean Watermelon Gazpacho paper line. Our chosen theme for the swap was going to be summer picnics and BBQs, this is what I came up with:

I left the cover plain as I was unsure of exactly what my partner will be doing with it. The entire mini was distressed using Tim Holtz Vintage Photo Distress Ink. I wanted the album to be bright and vibrant but also have a feel of a small hometown picnic.


The die cut on the left side of the page, and the one in the next photo below on the right were made using the out packing of the paper pack that the paper came in. I covered both sides with pattern paper and then ran the entire thing through my George (AKA Grand Calibur). I had to go over it a few times to get it to cut all the way through, but it worked! George can handle thin chipboard and two sheets of single sided paper. The side with the watermelon paper clipped to it, that is made out of junk mail envelopes and is using Laura Denison's Envelope Pocket Tutorial on YouTube.


The right side of the above is a paper bag that I ironed and then cut in half.

I love burlap. I really do, and for this project I think it totally added to the comfy cozy hometown neighborly feel. I love burlap.

I have a confession to make, the left side of this page is actually the box that the Venus razor refills come in. This mini is just full of surprises right? Oh and the right side of the album in the above photo is the other side of the paper page. This was made using a tutorial on youtube.


Anyway, I hope that you enjoyed my little share. Happy Crafting everyone!
Monday, July 16, 2012
My First EVER Altered Cigar Box
Recently over at Mini Album Scraps, okay well maybe about a month or so ago, there was an altered cigar box swap that opened and I was curious to try my hand. School has been demanding and hard so I was not able to join in a swap, but my friend Jules and I decided to do our own swap with one another with a little more time. I sat and sat and sat for some time thinking about what I wanted to do, and then trying to do it. I went through TWO cigar boxes trying to get the effect that I was looking for. In case you are wondering, that awesome glue crackle technique...... not so much on cigar boxes, at least I didn't have any luck..... After some time, and much love, thought, and labor, I came up with this:
 I really struggled with this box as I wanted it to be fun but grungy. The roses are I Am Roses that I dropped distress ink reinker on and then soaked with Tattered Angels Glimmer Mist. The large flower was made using some Graphic 45 Romantique collection, Tim Holtz's Tattered Floral Die, and a tutorial I found on the web. But the main piece of inspiration was this:
 When I had dreamed up this box, I had wanted there to be a french memo board in the recess of the inside, so that little things can be tucked into this treasure eve after the goodies inside are taken out and placed in their proper places...
The memo board was made using fabric and lace I had on hand, some satin ribbon in my stash, and the round things are actually brads I made using the iTop Brad Maker (which I LOVE). These were placed into the board by punching a hole at the intersections of the ribbon, placing some strong fabric glue in the back of the brad and then putting through the hole and securing in the back. It was super easy and fun to make! I hope that the recipient of this little guy loves it as much as I do.
Have a fun and crafty day!
Tuesday, July 10, 2012
Three Falls Hike Layout
So sorry for the delay in posting! Things have been very busy around here, and isn't that the way it goes?! It seems that every moment that I get a spare second, something pressing comes up to fill those spare days. But none the less, I have been trying to get a little more done in the crafting department, and will hopefully have more for you very soon. But today, I thought I would share another layout with you all from the trip I took with hubby back in May. While on the trip, we took a nice little hike that spanned three different waterfalls. It was so gorgeous and energizing and definitely was a reminder of why I love the outdoors. Anyway, here is the layout:

The layout came from a sketch over at Nuts about Sketches, but I cannot remember which sketch it was that I used........ that happens sometimes...... And some close up of the title:
 This title was inspired by this beautiful work of art found over at riverfrontstampin.com. That seam binding - which I absolutely love - came from a really good friend of mine, Jules. She has an etsy store filled with such lovely things!
Thanks for looking and have a Crafty inspired day!
Supplies: Bazzill, Stampin' Up! (Cardstock); Stampin' Up Letter It, Stampin' Up! Elements of Style, Inkadinkado (Stamps); Martha Stewart, Stampin' Up Postage Stamp, Stampin' Up! Decorative Label (Punches); Spellbinders (Die Cut); GCD (Pattern Paper); Misc. (Embellishments); Seam binding (PaperBagLady on Etsy)

The layout came from a sketch over at Nuts about Sketches, but I cannot remember which sketch it was that I used........ that happens sometimes...... And some close up of the title:

Thanks for looking and have a Crafty inspired day!
Supplies: Bazzill, Stampin' Up! (Cardstock); Stampin' Up Letter It, Stampin' Up! Elements of Style, Inkadinkado (Stamps); Martha Stewart, Stampin' Up Postage Stamp, Stampin' Up! Decorative Label (Punches); Spellbinders (Die Cut); GCD (Pattern Paper); Misc. (Embellishments); Seam binding (PaperBagLady on Etsy)
Tuesday, July 3, 2012
McCloud River Inn
During my recent Spring Break Scrap Fest, I decided that I wanted to also scrap photos from more recent outings. I do place all of my pages in chronological order, but I don't always scrap chronologically - meaning, I don't scrap my photos in order of the timing of events. I do date all of my layouts somewhere so I will know years from now, a general time frame. With that said, I wanted to play with photos from a recent mini vacation that hubby and I took. We both love to travel and have talked many times about traveling outside of the United States but we have not had the opportunity to do that yet. Instead, we are satisfied venturing and seeing all the things that the United States has to offer. As we are currently in California, we have been taking advantage of what California has to offer. And one of the sites is Mount Shasta. Being a girl from the Pacific Northwest, who enjoys unadulterated beauty, I was super excited to leave the city and go venture into Mount Shasta. We stayed in McCloud at the McCloud River Inn, a cute little bed and breakfast ran by the nicest lady who makes the best chocolate chip cookies and breakfast in the world. So, here is the layout.
 I doesn't look like much here on the page but it very stunning in real life. It is based off of a sketch from Creative Scrappers and the post can be found here. If you follow my blog regularly, a little while back, I posted about a layout that I ripped the backing off of because I and my hubby did not like the finished product. Well this is that layout. The blue/cream/brown background is actually the final result after testing the diecuts and layout against several backgrounds. It looks a little hideous as I sit here and write this and look at the layout, but I promise you, it is very stunning in real life. The floral spray is hand made and my first attempt - given it was my first try at doing such a thing, I am very satisfied with the way that it turned out. The die cut background was made using my Cricut and the Cindy Loo cartridge which has several different doily style die cuts on it. For whatever reason, the die and it's shadow cut at different sizes, but I liked the under/overlap effect that it created and decided to stick with it. I like happy mishaps.
And for your viewing pleasure, a few closeups of the details:

 Thanks for stopping by and happy crafting!
Supplies: Bazzill Basics (Cardstock); Die Cuts With a View (Pattern Paper); Flowers (Prima, I am Roses); Brads (Prima); Alphabet Letters (SEI, American Crafts); Tools (Provo Craft Cricut, Martha Stewart); Journaling spot (Making Memories); File Tab (7gypsies)

And for your viewing pleasure, a few closeups of the details:

Supplies: Bazzill Basics (Cardstock); Die Cuts With a View (Pattern Paper); Flowers (Prima, I am Roses); Brads (Prima); Alphabet Letters (SEI, American Crafts); Tools (Provo Craft Cricut, Martha Stewart); Journaling spot (Making Memories); File Tab (7gypsies)
Sunday, July 1, 2012
Bright Vibrant Lovely Layout
As some of you may or may not know, my home state is Washington State - in specific the Puget Sound Area, and I am a true Pacific Northwest girl at heart. With that comes a great love for the outdoors in all weather types and a love for Pike Place Market. I have so many fond memories of the Pike Place Market, and it was definitely one of the places I visited frequently before my move. There are many things that I love about the market, but mostly the lively atmosphere and street vendors - it's just my kind of place. And here is my finished project.
 As you may be able to figure out, this was also done using a sketch. The sketch I used comes from Nuts About Sketches and can be found in this post.
A while back, I ran across someone in the blogger world who matted everything with black. It looked so good, I decided that I should try it out, and I have been loving it. The matting in black adds just a little something extra that makes everything pop. In my experimentation, I have found that it is not always the case, but in general, you can't go wrong with matting in black. Also, on this layout, I used my iTop brad maker (which I love by the way) to create perfectly matched brads. Here are some closeups of the details. My title was cut using my Cricut and SCAL and the font is Markus Cow - you can find this font and a ton of other awesome scrapbooking fonts here. I cut the same title out 4 times and then layered them together to create my own dimensional like thickers.

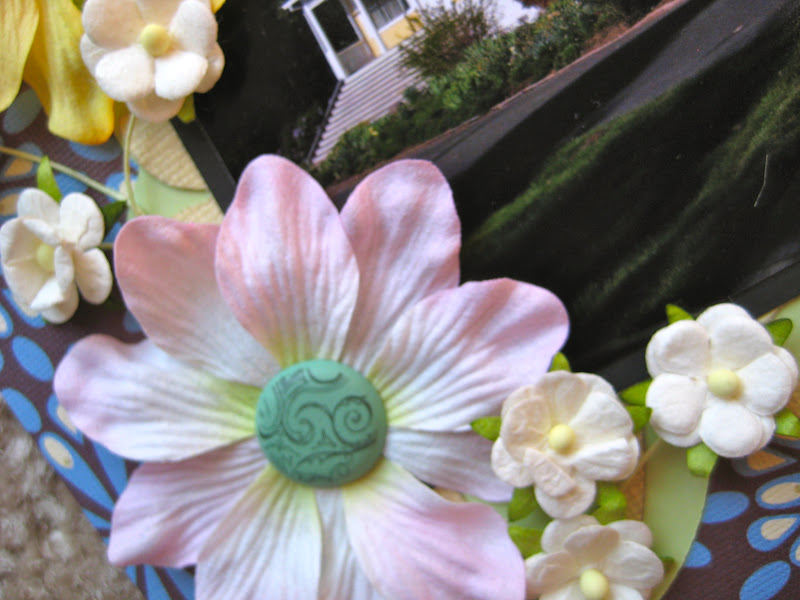
 The little flower with the gem, that came from a flower swap that I did a while back at Mini Album Scraps.
 I love the way that this layout came out. The bright vibrant colors and fun patterns really do highlight the bright and vibrant feel of Pike Place even on a cloudy day. I hope you enjoyed and feel inspired to create. Enjoy!
Supplies: Stampin' Up! Everyday Enchantment DSP (Pattern Paper); Bazzill Basics, Stampin' Up! (Cardstock); Flowers, Floral Border (Prima, Mini Album Scraps Swap); Brads (Imaginesence)
 As you may be able to figure out, this was also done using a sketch. The sketch I used comes from Nuts About Sketches and can be found in this post.
A while back, I ran across someone in the blogger world who matted everything with black. It looked so good, I decided that I should try it out, and I have been loving it. The matting in black adds just a little something extra that makes everything pop. In my experimentation, I have found that it is not always the case, but in general, you can't go wrong with matting in black. Also, on this layout, I used my iTop brad maker (which I love by the way) to create perfectly matched brads. Here are some closeups of the details. My title was cut using my Cricut and SCAL and the font is Markus Cow - you can find this font and a ton of other awesome scrapbooking fonts here. I cut the same title out 4 times and then layered them together to create my own dimensional like thickers.


Supplies: Stampin' Up! Everyday Enchantment DSP (Pattern Paper); Bazzill Basics, Stampin' Up! (Cardstock); Flowers, Floral Border (Prima, Mini Album Scraps Swap); Brads (Imaginesence)
Subscribe to:
Comments (Atom)