Hello all my lovelies,
I am sorry that there has not been much the past week or so. I have been very busy with final papers and exams, packing for a 6 week vacation, and flying to my destination for the next 6 weeks! With that said, as always, when you pack for a vacation, there are always things forgotten.... In this case, I forgot my adhesive....so until I have more adhesive (which should be here next week), I will be back with more fun scrappy things. I hope you all enjoyed your Thanksgiving festivities and the start of the Christmas Season! I will be sharing fun things very soon!

Friday, November 25, 2011

Wednesday, November 23, 2011
Wednesday Work in Progress: a mini mini
You could say that I am going through a mini phase at the moment..... Okay, maybe a big mini phase, but I can't help it, they are so much fun to do! I can attribute this phase to Lindsay over at Scrapjazz.com - she started it. Either way, I thought I would share a little mini that I am working on currently. This little guy has been a work in progress for several months. Not that it has been a hard project to put together - I have just been working on it as I get inspiration on the next steps. So here is the cover:
 It is a gate fold, that is held together with knotted and bowed ribbon in the front. The right side of the album is about a half inch larger than the left side so the longer piece actually keeps the smaller piece down when it's tied. I really like the knotted bow in the front, it adds so much detail and character. Just love it. And that paper, is just yummy with this project. And the insides:


 Everything on the inside is using scraps of paper from my paper box. Even the journaling strips are scraps left over from larger bits. (one of the cool things minis are good for). The "pages" themselves were all left over chipboard pieces that I had - thus very little trimming involved! As you can tell, the inside is still pretty simple - this is the work in progress part. I still have to do the journaling, embellishing, etc. And I'm not quite sure what type of theme it is going to carry all the way through. The photos are all of me and hubby while we were dating and span a good year. So, until I feel "inspired" again it will sit like this.


Saturday, November 19, 2011
Scrapbook Layout
I know! It's been months since I've shared a layout, and to be honest..... It's been months since I've done traditional scrapbooking with paper. I've made lots of minis, and cards, and other paper related projects. But scrapbooking..... not so much. Despite this, there has been a particular handmade frame and some photos laying around that I wanted to get int my scrappy book. Every time I look at it, I kept thinking " I really need to scrap those photos." Well the other night, I decided that rather than just saying it to myself, I was for sure going to do it. Right. Now.


I matched my papers and additional patterned paper to the paper on the photo frame. My dear friend Mandy made those frames for everyone who attended the crop, and I wanted to make sure and incorporate it into my layout. That meant color matching and them. Sometimes I create my own layout design, but when I just want to scrap and get something done (which is a terrible attitude to have about my precious memories) I will uses sketches, only because I want to scrap, not spend hours trying to figure out how to arrange everything! That was the case the other night, I wanted to scrap, not configure! So I used Sketch #186 from over at Nuts About Sketches. Slight side note: I love this place. I love sketches, and sometimes I have more than 3 photos, but don't want to make a separate book. Nuts about sketches is awesome, she does ONLY high number photo layouts. I LOVE IT. Seriously, check it out and her wonderful design team.
Here's a close up of the flowers:
 I love them, made them using the Tattered Florals Die by Tim Holtz, running them through an embossing folder and my cuttlebug and then layering. Delicious!
Hope you Enjoy! And as always, I love feeling your love for my scrappy dappy crafty life!
Supplies: My Minds Eye Bella Blvd, Unknown (Patterned Paper); Bazzill (Cardstock); Pink Paislee (Foam Letters); EK Success Abstract Flower Punch (Border); Sizzix Alterations Tattered Florals (Flowers); Cuttlebug Textile Texture Embossing Folder; TimHoltz Texture Fade Embossing Folder; Stampin Up! Hostess Set (Stamp); Stampin Up! Cherry Cobbler Ink (Journaling Spot)


Here's a close up of the flowers:

Hope you Enjoy! And as always, I love feeling your love for my scrappy dappy crafty life!
Supplies: My Minds Eye Bella Blvd, Unknown (Patterned Paper); Bazzill (Cardstock); Pink Paislee (Foam Letters); EK Success Abstract Flower Punch (Border); Sizzix Alterations Tattered Florals (Flowers); Cuttlebug Textile Texture Embossing Folder; TimHoltz Texture Fade Embossing Folder; Stampin Up! Hostess Set (Stamp); Stampin Up! Cherry Cobbler Ink (Journaling Spot)
Thursday, November 17, 2011
Another Home Decor Project: Fridge Magnets with a Tutorial
I have an obsession with fridge magnets. Hubby and I get them whenever we go on vacation, but I also like to make magnets. A few months ago, while going through my stash, organizing, condensing, and tossing, I came across my stash of these buckets:
 I have a ton of them, and many of them had these cute little magnet tins on the top that held coordinating chipboard buttons or other embellies. I don't think Prima packages this way anymore, but none the less, I had premade dimensional magnet shells. So, I went to work and came up with these
 In all I made about 6 of these from the tops and bottoms of the prima magnet containers. They were very very easy to make. This is what you will need:
Some type of item with some depth - here I used tins, you can use anything that will hold epoxy
2 part epoxy mix
photos and embellishments of choice
Strong magnets (these will be heavy with the epoxy in them)
And this is what you will want to do:
1. arrange your pictures and elements as you so desire and glue down. Keep in mind the depth of the item you are using as you will not want them sticking above the epoxy. Also, the epoxy will saturate things such as flower making them darker or translucent - so keep that in mind.
2. mix the epoxy according to the insturctions
3. poor the epoxy over the item until it is flush with the edge of your magnet container
a. If you notice, I have glitter in my large on: to do this, fill the tin halfway let it set for just a bit, then add your glitter or beads and finish filling. It will give you the in suspension look.
4. set them aside and let them dry - about 48 hours for them to be completely cured.
5. Adhere your magnet to the back and VOILA!
Hope you enjoy!
Tuesday, November 15, 2011
Banner Swap Pieces
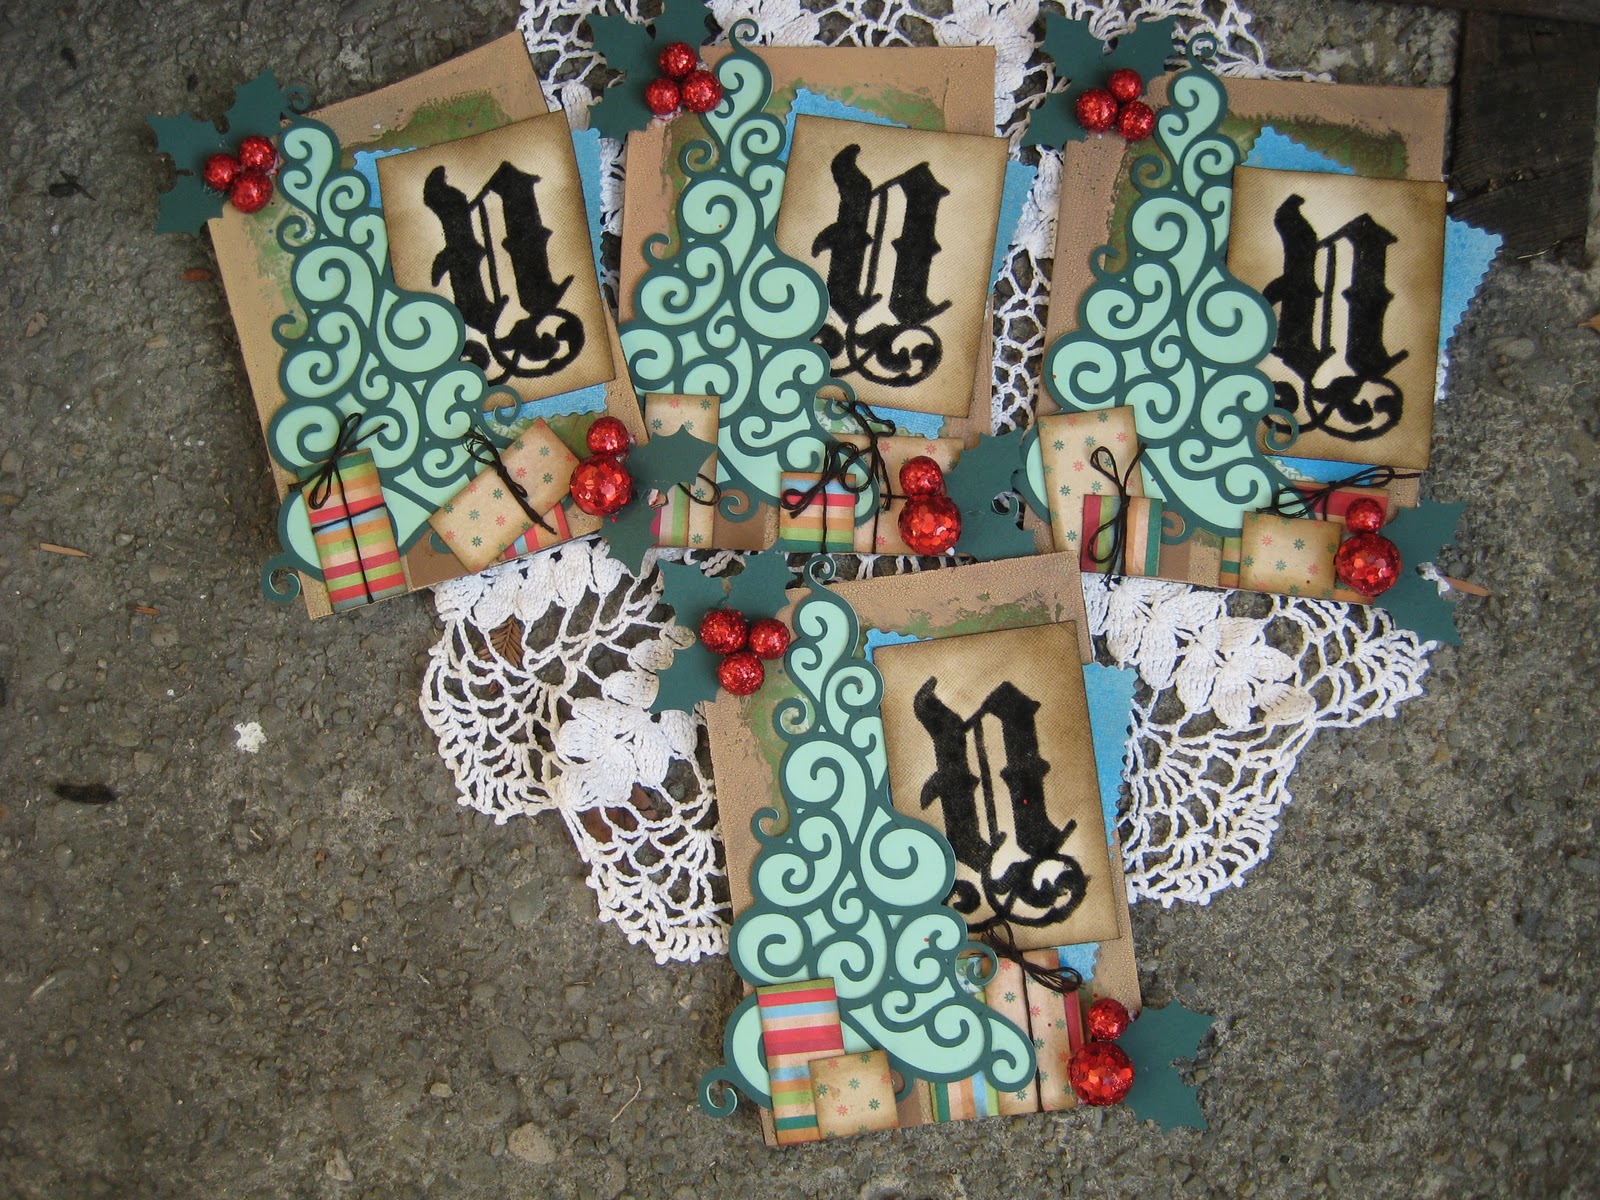
If you've been following my posts lately, you will have noticed a theme. Swaps. My current addiction, and I'm still loving it. Swaps are a good way to find others to share your love of all things paper with, and who share with you as well. You get different ideas, and ways of doing things. Swaps. Are. Awesome. Well, a while back, I joined a banner swap. The concept is you pick a word you want made into a banner, than each person would sign up for a letter to make for that word. You make several of the same letter (i.e. if you are making a "santa" banner and choose letter A, you would make 5 letters As keeping one for yourself and sending the rest to be divided) and once you send them off, you get the rest of the letters back. I like banners, and my husband LOVES and I mean LOVES when i decorate the house with stuff like this, particularly for holidays, celebrations, and special events. So I figured I could build up my banner stash. The swaps I signed up for were for "Noel" and "Winter." Each banner piece had to follow a specific color scheme and contain a minimum of 3 different types of embellies, and the letter had to be at least 3 inches tall.
This is what I came up with for the "Noel" swap:
 And here are some close up details for your feasting pleasure:

 This was a very challenging banner piece to complete for me, but was definitely worth it.
For the "winter" swap, I came up with this:

And some close-ups for the details:


These were a lot of fun to make. I think because I am a huge fan of the winter time. I love the crisp cold air, hot mugs of cocoa, snow, and cute winter clothing. I think my favorite thing on these are the mittens, it took forever for me to figure out how to incorporate them, then make them, but they sure are stinkin cute!
Thanks for stopping bye and sharing in my crafty pleasure! Once I get the other pieces of the swap back, I will show you the entirety!
Supplies List:
Noel: Die Cuts With a View Holiday Paper pack (Patterned Paper); Fun Flock (letter); Medici Text (Letter font); Tim Holtz Crackle Paint; Making Memories, Bazzil (Cardstock); Christmas Solutions Cartridge (Tree); Winter Wonderland Cricut Cartridge (Holly Leaves); Celebrate it Foam Sequence Balls (Holly Berries); Tattered Angels Glimmer Mist; Tim Holtz Distress Ink
Winter: Die Cuts With a View Holiday Collection Christmas Stack, DCWV Holiday Collection Winter Matstack (Patterned Paper); Bazzill (Carstock); Celebrate It Snowflake Ornaments; Flower Soft Ivory (Snow); Glitter; Tattered Angels Glimmer Glam Chandelier and Pixie Dust (Poinsettia); Stampin Up! Ink; Making Memories (Button); Fiber (mitten strings); Yarn; Winter Wonderland Cricut Cartrdige (Poinsettia); Spellbinders (mittens)
This is what I came up with for the "Noel" swap:


For the "winter" swap, I came up with this:

And some close-ups for the details:


These were a lot of fun to make. I think because I am a huge fan of the winter time. I love the crisp cold air, hot mugs of cocoa, snow, and cute winter clothing. I think my favorite thing on these are the mittens, it took forever for me to figure out how to incorporate them, then make them, but they sure are stinkin cute!
Thanks for stopping bye and sharing in my crafty pleasure! Once I get the other pieces of the swap back, I will show you the entirety!
Supplies List:
Noel: Die Cuts With a View Holiday Paper pack (Patterned Paper); Fun Flock (letter); Medici Text (Letter font); Tim Holtz Crackle Paint; Making Memories, Bazzil (Cardstock); Christmas Solutions Cartridge (Tree); Winter Wonderland Cricut Cartridge (Holly Leaves); Celebrate it Foam Sequence Balls (Holly Berries); Tattered Angels Glimmer Mist; Tim Holtz Distress Ink
Winter: Die Cuts With a View Holiday Collection Christmas Stack, DCWV Holiday Collection Winter Matstack (Patterned Paper); Bazzill (Carstock); Celebrate It Snowflake Ornaments; Flower Soft Ivory (Snow); Glitter; Tattered Angels Glimmer Glam Chandelier and Pixie Dust (Poinsettia); Stampin Up! Ink; Making Memories (Button); Fiber (mitten strings); Yarn; Winter Wonderland Cricut Cartrdige (Poinsettia); Spellbinders (mittens)
Sunday, November 13, 2011
Home Decor and Wall Art
I love making handmade pieces of wall decor. It's soothing, fun, personal, intimate, and well economical. So, today, I thought I would share some of the different pieces I have made over the past few years and hang on my walls. I love them.
The first one, is a collage I made after my husband and I got married. It is a slightly religious piece and focuses on the The Family: A Proclamation to the World, which is a little piece of revelation from the Prophet and his counselors of the Church of Jesus Christ of Latter Day Saints. For me the family starts with the couple, all the love, respect, devotion, courtesy, admiration in the couple impacts and is reflected in the rest of your family or future family. This is something that is important to both my husband and I and I wanted to capture it. And this is what I cam up with:
 This project took a lot of time. I had to measure, cut, layout and then glue down. But it is also one of my most rewarding projects that I have. The paper I used in the background is actually large sheets of water color paper I got from michaels. I used left over embellies from another project, and did a little bit of stamping.
This second one, was made as part of a National Scrapbooking Day challenge at Scrapjazz. We were given a necklace from Urban Outfitters as inspiration for something. And this is what I came up with:

I love it. Always have, and always will. It's whimsical, elegant, creative, inspiring, and touching all at the same time. The flowers were all made by me using wide pieces of ribbon. I trimmed photos down to fit inside those Making Memories metal frames, and used some of Tim Holtz's fragments for the patterned paper pieces.
The third piece is a little bit of home I take with me everywhere. I am a natural girl at heart, I love earth, trees, and no buildings. It is grounding, inspiring, calming, and freeing. When I moved to a California for school, I found myself far away from everything I love. So to keep the homesickness at bay and improve my mood, I made this:

This last one was really more just for fun. I was inspired by the stamps and wanted to try stamping with acrylic paint. Again, it is a piece that I am just in love with. Simple and fun, but a captured moment of bliss between my man and me.
 I love this stamp from the Donna Downey Unity Stamp cobrand kits. Just love it. That bird, was paper pieced with handmade paper.
I hope you enjoyed today's share and maybe found some inspiration for your own home decor and wall art!

The first one, is a collage I made after my husband and I got married. It is a slightly religious piece and focuses on the The Family: A Proclamation to the World, which is a little piece of revelation from the Prophet and his counselors of the Church of Jesus Christ of Latter Day Saints. For me the family starts with the couple, all the love, respect, devotion, courtesy, admiration in the couple impacts and is reflected in the rest of your family or future family. This is something that is important to both my husband and I and I wanted to capture it. And this is what I cam up with:

This second one, was made as part of a National Scrapbooking Day challenge at Scrapjazz. We were given a necklace from Urban Outfitters as inspiration for something. And this is what I came up with:

I love it. Always have, and always will. It's whimsical, elegant, creative, inspiring, and touching all at the same time. The flowers were all made by me using wide pieces of ribbon. I trimmed photos down to fit inside those Making Memories metal frames, and used some of Tim Holtz's fragments for the patterned paper pieces.
The third piece is a little bit of home I take with me everywhere. I am a natural girl at heart, I love earth, trees, and no buildings. It is grounding, inspiring, calming, and freeing. When I moved to a California for school, I found myself far away from everything I love. So to keep the homesickness at bay and improve my mood, I made this:

This last one was really more just for fun. I was inspired by the stamps and wanted to try stamping with acrylic paint. Again, it is a piece that I am just in love with. Simple and fun, but a captured moment of bliss between my man and me.

I hope you enjoyed today's share and maybe found some inspiration for your own home decor and wall art!
Saturday, November 12, 2011
Unity Kit of the Month November Sketch Challenge
I'm a huge fan of Unity Stamps. They're designs are wonderful, their quality is good, and they're reasonably priced. I have a lot of their stamps, and admittedly don't use them as often as I should. Frankly all of my stamps are not used as often as they should be. So I have been trying to make a conscious effort to get the most out of my stamps. Unity Stamp has a monthly sketch challenge on their blog. This month's challenge can be found here. The only require aside from the sketch is that all the stamps have to come from Unity's Kit of the Month sets - doesn't matter which set, just Kit of the Months. Here is what I came up with
 When I saw the sketch, I immediately thought "Gift Card Holders" and the convenient part is that this little guys are the same size as a regular 4.25x5.5 inch card. So they can slipped into an envelope just like that! The other cool part: They can be reused in a mini album! I made sure to put patterned paper on both sides, and use a stamp that is generalizable, so it can be incorporated into those post holiday minis. Here is a close up of the sentiment/image.
 And the coolest part of this project, is that the tag is actually being held in by a clear pocket!
 I cut down a piece of sheet protector to wrap around the front before I put on the patterned paper on the back. That way the tag which holds the gift card could slip in and be secure. I am in love. Thanks Angie for the wonderful and inspiring sketch!
Supplies: DCWV Holiday Collection Paper Pack (Patterned Paper); Bazzill Basics (Cardstock); Unity Stamp KOM September 2010 (Image/Sentiment); Offray, Pink Paislee (Ribbon); Spellbinders Scalloped Rectangle, Spellbinders Rectangle (Shapes); Glimmer Mist English Ivy and Walnut Gold (Ink); Stampin UP! Cherry Cobbler (Distress)


Supplies: DCWV Holiday Collection Paper Pack (Patterned Paper); Bazzill Basics (Cardstock); Unity Stamp KOM September 2010 (Image/Sentiment); Offray, Pink Paislee (Ribbon); Spellbinders Scalloped Rectangle, Spellbinders Rectangle (Shapes); Glimmer Mist English Ivy and Walnut Gold (Ink); Stampin UP! Cherry Cobbler (Distress)
Subscribe to:
Posts (Atom)