Tuesday, February 28, 2012

Real Photo Box and Embossing Folder Storage

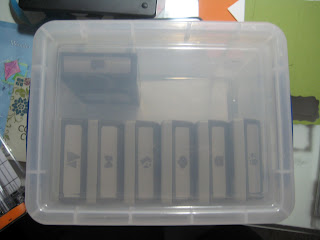
Storage is something that I always struggle with and am always looking for new and better ideas.  Recently, I decided that I needed a more reasonable way to store my Embossing folders, plates, and cutting related things.  I had been storing them in these awesome little photo thingys that I had altered.  However, creating the inserts for the folder to hold my embossing things was very time consuming and cumbersome.  And I do not have time for either of those words in the same sentence right now.  When I decided it was time for a storage change, it was really late at night, like super late, like 2 a.m. late.  Despite that, I came up with a super awesome, fast and easy way to store all my stuff.  I made a box using chipboard, my Bind-It-All, paper, and Ribbon.  And this is the finished product:

It fits nicely where I need it to, it holds everything that I have and is very easily expanded.  The coolest part is that I didn't have to purchase anything from it, and I finally used something from the DCWV Real Photo Paper Pack that my dear, sweet, and supportive husband insisted that I have so much he bought it for me despite my objections.  Sigh.  I hate to admit that he was right, and the stack does on occasion come in handy.  Sigh.  So how did I do it?

I took 3 pieces of 12x12 chipboard and cut them into 6x12 lengths, and glued two together.  I did that for each side that I needed.  Next, I adhered the paper to one side.  I then punched centered holes into all of the pieces on three sides.  One of the large pieces I punched centered holes on all 4 sides, this is the piece that goes on the bottom.  Last, I weaved ribbon through the holes in a criss cross manner to bind them together.  Start to finish this took me about 3 hours (I am a slow worker).

Sunday, February 26, 2012

My New Storage Love

Today, I thought that I would share with you my new found love for an awesome storage unit.  Really Useful Boxes.  Not only are they really useful boxes, but that's also their name, so fitting seriously.  Why you may ask. Well I have been looking for a more modular storage system in order to condense all the junk I have (and it's a lot) but still have it accessible and organized.  While scouring the internet, I ran across another blogpost (but can't remember where or find it now) in which the person was using these boxes. I immediately went to the hardware store here and got some.  And let me tell you they are fabulous.  Here are pictures of what I am storing and how it looks:

This is a 4L Really Useful box, as you can see, it will hold probably 6 of the large Martha Stewart Punches, and 9 of the small edger combo ones.
 This is another 4L Really Useful box, the same size as the one above.  And it will hold 17 of the EK success edgers nicely.  I don't have a whole box full at the moment, but when I do, the Fiskar ones will probably find a new home in another Really Useful box.
 This is a 5L box, it'll hold my guess 8-9 of the EK success deep edger punches.  There is about an inch or so gap between the top of the punches standing up and the top of the lid, it's a perfect fit.

 This is a 3L Really Useful Box, and it hold all my Stampin' Up! Large punches.  I have a few more spaces before it's full, and I am estimating that it'll hold about 10 of these same size punches. 
 This is an 8L Really Useful Box (they say it's for shoes) that I am storing my  Sizzix Dies in,  I currently have 5 of the Large Dies and some smaller ones.  This box is a perfect fit for the large square dies, and as you can see, can fit probably about 15 of them.
I am seriously in love with this company.  Their boxes are all made to fit together and stack, and their dimensions are perfect for many of my crafting items.  One of the things that was important for me was to have the perfect fit but to have my punches standing up, so I can easily see the punch image.  These boxes are also fairly reasonably priced not on sale.  I believe the 8L box cost about $8.99 before tax.  Another really nice feature is that the handles on these guys lock in place but are not difficult to unlock either.  Either way, if you're looking for more stackable and modular storage, this is definitely recommended by me.

Friday, February 24, 2012

MAS Recipe Swap and My Cards

I recently joined a Recipe Swap on my swapping site Mini Album Scraps.  This is a huge first for me, I normally don't do these or have any interest in them, but I figured, why not?  I'm a huge cooking fan, I love to cook, and use recipes, so it is important that the cards be functional.  Also, I am a very very messy cook, I do not have a single recipe that is still untouched by food things in my recipe box.  Because of this, I had to think very hard about how I was going to make a pretty card, but have a recipe that was:
1.  Large Enough to Read Easily
2.  Pretty and Functional

While trolling YouTube looking for ideas, I remembered seeing a tutorial over at Split Coast Stampers for a pocket type card - The Criss Cross Card.  And this is what I came up with:


I made my own pattern paper using one of my all time favorite stamp sets by Unity Stamp Co  in four different complimenting colors.  All the color of the papers that I choose to use were matched with those colors.  The one thing that I did do differently was that because I did not want to glue the edges together to make the pocket, I made gussets out of paper and put those on either side of the pocket so that the card could slide in and out nicely.  I did not have to go out and purchase anything special - score for me AND all 5 of these guys were put together in about 3 hours or so.  

I hope you enjoyed!

Supplies:  Bazzill (Cardstock); Stampin' Up! (Cardstock); Prima (Flowers); Bling (Stuiod 18); Stampin' Up! Basic Black, So Saffron, Baja Breeze, Cherry Cobbler, and Old Olive (Ink); Stampin' Up! Four Frames (Stamp); Unity Stamp Co (Stamps); Spellbinders Tab (Diecut); Stampin' Up! (Punch)

Tuesday, February 21, 2012

Mini (And Not So Mini) Albums for Beginners

Recently I have received a lot of questions about my mini albums and how to do them, so I thought I would share what I have learned in my brief explorings of the Mini Album World.

1.  Adhesive: Good Adhesive is very, very important in any endeavor, but more so in mini album making.  When I'm working on mini albums, I use two types of adhesive.
  • Liquid
    • I really love Scotch Quick Dry Adhesive.  It is a thick nonrunning liquid adhesive that dries entirely clear.  The best parts is that is fairly reasonable on price, a little goes a long way, and it isn't runny making it easier to use.  
    • I use this for the adhering of my papers, photos, embellishments.

  • Double Sided Tape
    • If you are making your own albums from scratch (meaning including the cover) you will absolutely need this.  I make my own albums including the covers from scratch.  I have found that using my adhesive gun, although works, does not work at all.  The papers will buckle from the chipboard and each other in mini albums.  I have not had this problem with double sided tape.  I recommend two different brands:
    • Redline
      • it is clear double sided extra strength adhesive with red plastic protectant on each side.  You have to cut the lengths you need and the red protectants will statically cling to EVERYTHING. 

    • Scor Tape
      • Also a clear double sided extra strength adhesive, you can ripe the length that you want rather than using scissors.  It is easier to find, and cheaper.  Also the protectant lining doesn't stick to anything other than the tape until you are ready. 

2.  Tools: There are a few simple tools that you will need and can use over and over again
  • Crop-a-Dile
  • Big Bite
I use the Crop-a-Dile and the Big bit often particularly when working on my covers.  
  • Ruler with Metric Sizing
3.  Basic Materials:  There are a few material types that I ALWAYS keep on hand when I am inspired to make a mini album
  • Chipboard:  I purchase packages of chipboard in 8.5x11 and 12x12.  However, I also save all of my cereal boxes - two pieces of cereal box placed together will create the same thickness as one piece of chipboard.
  • Coordinating Pattern Paper: Even if I use odds and ends on the insides of my album, I always make sure to have two sheets of every piece of pattern paper that I purchase for the making of the covers
  • Distress Ink:  You absolutely need to have some distress ink in basic colors - Light brown, Brown, and Black.  You will use them to ink the edges of everything and definitely are worth it.
  • Binder Rings
  • Cardstock
If you have any questions, please feel free to email me. If there is anything that I have left out that you have questions about, please contact me!  Enjoy your endeavors into Mini Book making!

Sunday, February 19, 2012

A Fun New Mini and my Crush on Tim Holtz

I am a YouTube junkie. I love to search for fun new tutorials or ideas or see beautiful work of others. It's just fantastic all the way around. A few months back when I began my mini album obsession I went looking for samples of fun tags. While doing that fairly unsuccessfully I found this awesome tutorial. This particular project was meant to be a stand alone album or insert to another album. But I was not satisfied with that I wanted it to be an album but more than on page. With that and armed with the knowledge of my previous minis I set to work and figured a way to bind two of those file folder pocket thingys into a mini book. And I have to tell you that I am so very pleased with the outcome! Here are the photos:

The spine and the cover:


The inside of the front cover and page one.  I covered the binding with the brown paper to create additional pockets, and cover up the areas where the folders were attached to the binding.


 Page one extended:


 Back of Page one, extended, and the start of the second file folder.  So this is the center of the book.

 Back of the second file folder and back cover:

The front of all the tags.  As you can tell, some of them have photos, but most of them are not finished and decorated yet.

And the back of the tags.  I placed journaling lines with stamped decorative images.


I have not completed putting photos as you can tell but nonetheless it is still a spoonful of awesomeness. I think there is something rewarding about good outcomes to good ideas on the first try. It's very satisfying. Reasons why this particular little guy rocks so much:
  1. It is entirely made from scraps - the only new sheets of paper used were used on the cover.  Seriously, that's it, everything else (including the tags) are scraps from other projects!
  2. It will hold 3.5x5 photos.
  3. There are 21 tags, with room for more if you wanted it that way.
  4. I did this in a weekend.
  5. It is made out of file folders.
  6. Remember this post?  Well all the layouts in here, unless they were my own ideas, were taken from the card sketch websites on that post!  That's right, I figured I would show you how to turn them into mini album layouts.  
  7. It gave me a love and appreciation for Distress Ink, which brings me on to my next point.....
 I love Tim Holtz.  Seriously, if it weren't illegal to keep people in your basement against their will, I'm pretty sure Tim would be in mine, so that I can make use of his creative genius any time I so desire.  (If you're reading this Tim, I mean that fondly).   As I said, I made this mini entirely from scraps of paper - NOTHING was coordinating on its own.  Using the distress inks I think really made it possible to create a grungy mixed and matched with a theme album.  Seriously, I found my love this mini.  If you do not like distress ink but do minis, at least get them in the neutral colors. Seriously, it will add a subtle and unifying feeling to your projects.  I am now a huge fan.

Supplies: My Sentiments Exactly, Studio G, Paper Trey Ink Journaling lines, Paper Trey Ink Love and Marriage (stamps); Tim Holtz Walnut Distress, Stampin' Up! Chocolate Chip (Ink); Bazzill, Recollections (Cardstock); My Minds Eye, SEI, Making Memories, Chatterbox Inc, Provo Craft, K and Company, Crate Paper (Patterned Papers); Prima (Flowers); Martha Stewart, Stampin' Up! Large Tag (Punch); Spellbinders Nestabilities Labels Dies (Tags); Delta Acrlyic Paint; Pink Paislee Anthology Brad (Cover Bling);

Friday, February 17, 2012

Stick Pin Goodness

I went to my mailbox the other day and when I opened it, my box with over flowing with packages. NO JOKE.  I had purchased some none consumable items (new stamp blocks and some Journal Art Templates) and they all arrived with my stick pin swap package!  Seriously, if my box were full like that every day I think I would be in heaven, no need to pass.  Because the pins brought me such great joy, and really they did brighten my day a lot, I thought I would share them with you all.  So, where they are in no particular order:

A Photo of all the beautiful packaging I received (and of course have saved)


From Becca


From Val

From Judy

Aren't they just beautiful?!  I got 9 pins in all, and sent 9 in.  If you want to see what everyone sent in, check out this video Lisa, the MAS owner, did with all the beautiful stick pin goodness!

Wednesday, February 15, 2012

Paper Trey Ink Card Share

For the month of February, Paper Trey Ink has been doing things to celebrate their 5th Annivarsary.  As part of the celebration, one day last week they posted card sketches with the challenge to make a card based on one of the sketches.  Although, I wasn't able to play along with them in the challenge, I loved the sketches, and wanted to make some cards using them.  Here is what I came up with:


I loved both cards so much, and they turned out fabulous.  Not only that, but the sketches are awesome as well.  You can find a PDF download of the 5 sketches they provided in this post here.  Hopefully, these sketches inspire you as much as they have me!

Supplies:  Mehndi Medallions, Masculine Motifs, Sending a Big Thank You (Paper Trey Ink); Tim Holtz, My Minds Eye Bella Blvd (Patterned Paper); Standard Circles, Small Ovals Dies (Spellbinders); Basic Black, Certainly Celery, Chocolate Chip Cookie Ink (Stampin' Up!); Bazzill, SEI (Cardstock); White Pigment Ink (Colorbox); Clear Embossing Powder

Monday, February 13, 2012

Stylish Pin Storage

Today, I am going to start off talking about Mini Album Swaps (of course, what else would I talk about?)  One of the swaps that I have been participating in fairly regularly is the Stick Pin Swaps.  A stick pin swap is basically getting some pretty floral pins, adding beautiful beads to them and then swapping them.  It is a lot of fun, and gorgeous pins are everywhere in scrapbooking right now.  And to be honest, you can make tons of different stick pins with very minimal supplies - so it's a fun, cheap embellishment as well.  With that said, although I have only done a few of the stick pin swaps (2 at this point) I have TONS of pins already.  And the pins are just beautiful, so I wanted them to be visible.  Thus arouse a need for a stick pin pin cushion. But it could not be any pin cushion, it had to be a beautiful one, that fit my style and decor.  I wasn't quite sure how to make them, so I did some research, and came across this YouTube video.  Watch it, it's totally worth it.

And this is what I came up with:


 And a close up of all the beautiful embellishments


Rather than using fiber fill, I used some decorative sand that consistency of emery sand from michaels.  They sell it in the floral department.  It is heavy and thick so it holds my pins nicely.  I got everything I used on coupon, and still have enough sand fill to make another pin cushion!

I have to be honest, this little guy took me a while.  After placing the silhouette piece on I wasn't quite sure what else to do, but it definitely looked very unfinished and ugly.  But it sat on my shelf waiting for the right inspiration.  Well a few days ago while digging through some of my stuff, I found that little Carpe Diem tag and thought it would go perfectly.  I had had the beautiful feather pin already in mind, but it didn't go well with what I had so it too sat.  However, once I put the tag on, everything fell in to place and I had a finished pin cushion.  I am so happy with the way it turned out.

Supplies: Mini Brown Bucket (Michaels); Brown fabric (Joann's); Green and Brown Trims (from my mother); Flower (Prima); Silhouette (from Korean Market); Feather (Feather Accents); Metal Tag (Creative Imaginations); Bling (Michaels)

Saturday, February 11, 2012

TP Mini Album Swap Partner's Album

Some of you may remember my post back in November/December with a little TP mini album for Mini Album Scraps.  Well I know I am very late in posting, but I got my album back from my partner Lisa (and the owner of MAS).  And I thought I would share the beautiful work of art she sent me:

The Front Cover:  Check out that lovely fiber/ribbon. yummo!
 The inside pages:


A Close up of the above page.  This page was my ultimate favorite!


 And the last page:  Check out that beautiful clock!  I LOVE it.


I LOVED this mini, it is so gorgeous and filled with such yummy details and tags. Thankyou Lisa for the beautiful and lovely mini.  If you are interested in joining swaps, please come on over to Mini Album Swaps.

Friday, February 10, 2012

The Leibster Blog Award


I love this award I really do.  I have received it once before, and was very honored, and I am even more humble and honored to receive it again.  And was very much surprised.  Shaunery over at Creative Chaos identified me as a recipient along with 4 other very wonderful and talented women.  Check out this post to see who she nominated and their blogs. So you may be wondering what the Leibster Award is..... Well here is the run down of the award:

This award is for the "underground" bloggers.  Or bloggers with talent that have a follower count of 200 or less.  The purpose of the award is to draw attention to these bloggers for their contribution.  You need to comment on the blog of the person who awarded it to you, in addition to then passing the award on to another 5 individuals, and posting on their blog letting them know they have been nominated.

With that in mind, I first want to thank Shaunery for her nomination of me, as well as her loving, thoughtful and kind words.  To be honest, this brightened my day especially since on occasion (okay maybe more than occasion) I wonder if anyone actually reads my little bit of cyber space foot print.  Her words were uplifting, gratifying, and validation that someone does actually find me inspiring.  Now, on to my nominations:

  1. Nora over at A Creative Touch.  I love her cards, she has such a beautiful, bold, and elegant style.  About a year ago, I got a card from her, and it was so stunned by its beauty and elegance that I still have it, and keep it as inspiration in my own crafting world.
  2. Marla from Lake Avenue Designs.  I stumbled across this talented lady while surfing YouTube.  But I LOVE her work when it comes to mini albums, so many ideas, designs, and gorgeous work. It is an endless source of mini album inspiration to me.
  3. Pat at Scrap Wizard.  Again, her mini albums and detail are amazing.  I just love to look at all the beautiful papers, texture, depth.  She is also a swapper, and I am constantly seeking out new ideas to include in my own swaps, which she is fabulous for!
  4. Claire from My Creative Spirit and YouTuber CharlieJones2686:  Her work is AMAZING!  I love it so much.  Her minis are fabulous and again I find an infinite amount of inspiration in her beautiful, bright, and wonderful mini albums.
  5. Deann from CraftDee1 .  I know DeAnn from over at MAS.  But her projects are so amazing!  She does such beautiful work, and I always find myself inspired!
So, go take a gander, at these lovely ladies and their work, and leave a lovely comment!

Thursday, February 9, 2012

The Ins of the Mini Album


Recently, while working on an article for Scrapjazz.com, I went searching for some miniature sized layout sketches.  I quickly learned in my searches, that not only did they mostly not exist, but others had had similar questions.  So, today, I thought that I would share with you all the resources that I did find in existence, along with some tips on how to create your own.  So let's talk miniaturized sketches.

What I did Find:
Things that I noticed:
I was working on a mini album that measured 4x4, most sketches stop at the 6x6 size.  Well, sometimes I want a mini mini......... And if you are like me, you may also want a mini mini sometimes.  So, here are some thoughts on how to find even more sketches.

Hopefully, you found this helpful and insightful.  If you find any additional resources, or things to share, please leave a comment!

Tuesday, February 7, 2012

Gosting Ink Comparison

If you read my last post, you will know that I have been working on my ghosting technique.  I am really enjoying it and its versatility.  It is something that can be dressed up or down, which is just nice to have.  And well it's something new to try out.  In my recent wanderings of the world of ghosting, I have been trying different inks.  The tutorial found here suggests using a waterbased ink.  The first time I did the technique I used my distress inks.  Mainly because I hoard the colors but rarely use them.  After such a great success, I decided that I wanted to use my inks from Stampin' Up! - which I love.  However, despite my love for my Stampin' Up! inks, I was not impressed with the outcome of this technique in tandem with the inks.  The dark colors stained the versamarked portion and the ink did not go on as slick and smoothly as with the distress inks.  Also, I got more a clear distinct line with the Stampin' Up! inks, which I think is attributed to the rather "stiff" nature of the inks.  So, here is a picture of the results side by side:


The left is a pink and the black from Stampin' Up! while the right photo is with Black Soot and Worn Lipstick Distress Ink.  The image done with Distress ink has a more finished, and smooth look while the Stampin' Up! inks have more of a grainy chalky look to them.

One other tip when trying this technique:  Use a rubber brayer.  The first time I did it, I used a nonrubber brayer and it was hard to control the action.  Although the rubber brayer will also slip when doing this technique with distress ink, there is less slippage.  Also, as mentioned previously, this technique is like water on an oily road.  The distress inks on the slick surface of the glossy paper will be slick, so make sure and be ready and use a firm steady motion.

Supplies:  Worn Lipstick, Black Soot (Ranger Distress Ink); Basic Black, Pretty in Pink (Stampin' Up! Classic Ink); Glossy Paper (Ranger Inkssentials); Rubber Brayer; Sexy, Silly, and Sassy Stamp Set (Unity Stamp Co.)

Sunday, February 5, 2012

Cookies, Men, Glossy Cardstock, and Ghosting


Bet you are wondering what cookies, Men, glossy cardstock, and ghosting have a common huh?  Well, after this post, you will know how they are all related.  As some of you know, my dearest and I are about 1000 miles apart one direction while we transition out of the military and into a civilian life.  As that is the case, things can be tough, and I am constantly trying to find ways to let him know I care about him, even if I am too far away to do simple "little" things.  Recently, he has been talking about how he'd like some snickerdoodle cookies.  They are his favorite and by favorite, I mean obsession.  Case in point:

Me: I was thinking of baking something.
Him: Snickerdoodles?
Me:  I was thinking maybe a pie.
Him: Snickerdoodles?
Me: Or how about some chocolate chip cookies?
Him: Snickerdoodles, please?

We have this conversation EVERY time I bake something, which in my house is fairly often.  Cooking is another loved hobby of mine.  About a week ago, I got the idea in my head that it would be fun to bake him some snickerdoodles and FedEx them up to him. But, I could not just simply send the cookies, there HAD to be a card involved.

A while ago, I got the below stamp set from Paper Trey Ink .  It was the best decision ever.  Finding man themed, and good man themed scrap/stamp items, is like finding the perfect fitting pants the second time, or a real life Unicorn.  Talked about, never actually experienced.  Well, I cannot tell you how much I love this set.  It is one of my go-to sets for all things masculine.  With that said, there are still some images from the set that I had yet to use.  One of which is that lovely Koi you see in the bottom left of the image.

Related to this is the fact that I have been trying to expand my stamping repertoire.  Which is related to something else entirely unrelated to this post.  None the less, in my efforts to expand my card and scrapbooking repertoire, I decided that I wanted to try an awesome technique.  Ghosting.  Yep, that's right.  Ghosting.  This is where you take Glossy Cardstock and Versamark ink, stamp your image in versamark onto the glossy paper and then brayer over the paper with ink.  A complete how-to can be found here

So, armed with cookies, glossy cardstock, a new technique, and a masculine themed stamp,  I came up with this:

Supplies:  Gloss Paper (Ranger Inkssentials); Versamark (Tsukineko); Faded Jeans Distress Ink, Concord Grape Distress Ink, Pine Needles Distress Ink (Ranger); Masculine Motifs (Paper Trey Ink); All Year Cheer II (Stampin' Up!); Bazzill Cardstock; Rubber Brayer; Brown Cross Stitch Floss

And this:

Supplies: Gloss Paper (Ranger Inkssentials); Versamark (Tsukineko); Faded Jeans,Pine Needle, Antique Linen, Milled Lavender Distress Ink (Ranger); Masculine Motifs (Paper Trey Ink); Archival Ink (Ranger); White Pigment Ink (Colorbox); Brown cross stitch floss; Bazzill Cardstock

And let me tell you I LOVE them.  After making these cards, I seriously wish that I had more males in my family.  It is masculine and beautiful, things that men like very much.  Masculine beauty.  It is a thing of beauty for me.