Showing posts with label Rubber Stamping. Show all posts

Thursday, September 20, 2012

Christmas Junk Journal

I know, it is WAY to early to be thinking about Christmas.  But, today I will be posting about christmas nonetheless.  Recently, I did a "swap" with a friend of mine who really really loves all things Christmas and Winter.  She does very many nice things for many, and I thought it would be nice for her to have a fun little junk journal for her own, and because Christmas is her favorite, it would of course have a Christmas theme.  So keeping the writing short and the photos flowing, here are the photos!


I cannot tell you had much fun I had making this little guy.  Trying different techniques, throwing things together, spilling bottles of glimmer mist........  And if you would like to see the whole thing you can check out this video on YouTube:

http://www.youtube.com/watch?v=rV04oWkNN8E&feature=g-u-u

Thanks for stopping by and have a crafty filled day!

Supplies:  Stampin' Up! Medallion, Stampin' Up! Christmas Collage, Stampin' Up! Bingo Card Background, Stampin' Up! Jolly Bingo Bits, Hero Arts Spirit of the Season, Inkadinkado Winter Silhouettes, Inkadinkado Ornate Snowman, (Stamps); Lindy's Stamp Gang Fuzzy Navel Peach, Tattered Angels English Ivy, Tattered Angels Cranberry, Tattered Angels Coffee (Ink); Martha Stewart Florentine Gold, Lindy's Stamp Gang Reindeer Green (Embossing Powder); Spellbiners Poinsettias, Paper Trey Ink Library Pocket (Die Cuts); Die Cuts With a View, Project Imagination (Pattern Paper);

Saturday, August 18, 2012

More Scrappy Fun

Hello all my lovely readers!  Today I am going to share with you another layout from my recent trip to Scrapbook Expo.  I went for both crops on Friday and Saturday in an attempt to make friends (which I am happy to say I did).  But admittedly have to say that I did not get nearly as much done as I wanted to.  Although I went for cropping on both days, Friday I came VERY underprepared.  I had made an effort to pack as a minimalist and take only what I needed.  The problem with that is I left home most of what I ended up needing... let's just say I am a terrible planner.  So, when Saturday rolled around, I came over prepared and did not get nearly as much done as I had planned - partly because I spent the morning with hubby eating breakfast and shopping at the Expo.  Long story short, I am sharing one of the layouts that I created while attending the Expo crop.


I used a sketch from Nuts About Sketches (Click Here for the Sketch).  I did do some minor changes to the layout to fit the photos that I had, and the feeling I wanted.  The journaling (which I haven't added yet) will go on the right side of the layout in that open space.  One of the coolest things about this page was that I got a chance to try out the New American Crafts customizable thickers.  I did not have what I needed in my stash, so I figured it was a good time to try out the Thickers I had gotten for free in an order.   I LOVE THEM!  It was super easy to add the white glitter, and it all stuck very well with no flaking of the glitter once I was done. 

I hope you enjoyed today's share and have a creatively inspired day!

Supplies:  Basic Grey Origins, American Crafts Campy Trails (Pattern Paper); Bazzill Raven (Cardstock); Stampin' Up! Soft Suede, Stampin' Up! Lucky Limeade, Stampin' Up! Calypso Coral, Stampin' Up! Pool Party (Ink); Lindy's Stamp Gang Bit o Bubbly (Shimmer Spray); American Crafts Thickers (Title); Martha Stewart White Glitter (Glitter); Prima (Flowers); Stampin' Up Pennants Punch, Imaginesce iTop Brad Maker (Tools); My Mind's Eye (Paper Embellishments)

Wednesday, August 8, 2012

Thanksgiving in August

A while back, I was the recipient of a very kind and gracious RAK package.  I am embarrassed to admit that too much time has passed from the time of that gift and me getting around to returning the kindness.  With that said, today I thought I would share some of the things I have been working on to include in the returned act of kindness.  The particular person that I am sending this package to, HATES and when I say hates, I mean LOATHES, card making.  But I have also noticed that she is often in need of cards for various reasons.  I thought that it would be nice to include some cards for her for the upcoming holidays.  This is what I have come up with:

I just have to say that the Day of Gratitude Stamp Set is one of my favorites, the images are just beautiful and the sentiment is wonderful and encompassing of the spirit of the Thanksgiving Holiday.  And this is the first time getting to use this stamp set as it was a Christmas gift from last year!  (Thanks hubby).
 Isn't that pumpkin awesome?  I love it, and have my dear friend Shannon to thank for showing me how to make them.  It is definitely my favorite fall thing to do.
 
Eventhough it is August, the holidays are right around the corner.  So I made a set of both designs for my dear friend.  I have some Christmas cards in the making, but those are still waiting for some finishing touches, so today, it is just the Thanksgiving Cards.  I had a lot of fun making these cards, and may even make some for me in the future!

Hope you enjoyed today's share, and have a crafty fun filled day!

Supplies: Bazzill, Stampin' Up! Garden Green, Stampin' Up! Very Vanilla, Recollections Kraft (Cardstock); We R Memory Keepers (Pattern Paper); Tim Holtz Distress Ripe Persimmon, Stampin' Up Classic Old Olive (ink); Stampin' Up Day of Gratitude (Stamps); Spellbinders Ovals, Stampin' Up! Owl Punch; Spellbinders Lacy Labels, Spellbinders Circles (Die Cuts); Stampin' Up! Square Lattice (Embossing Folder)

Sunday, August 5, 2012

Crafty Favor for My Mother

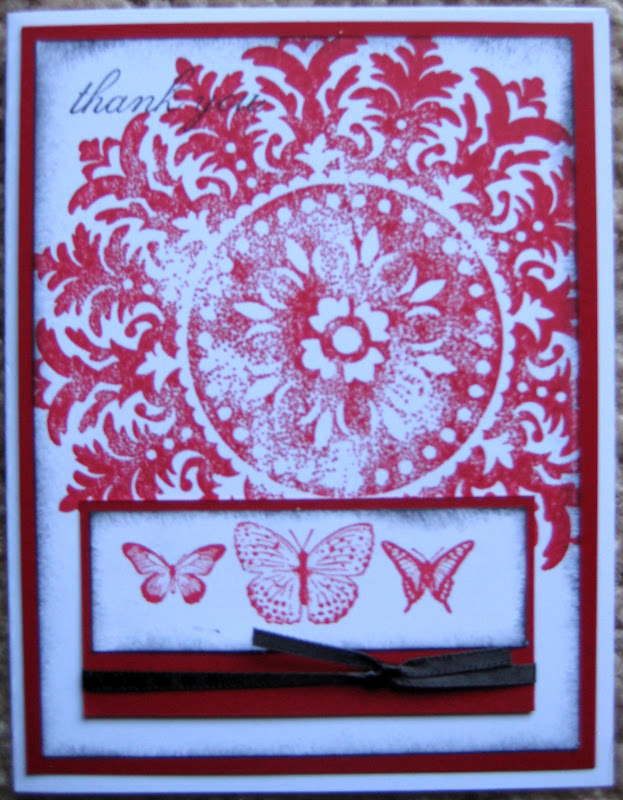
A few days ago, my mom sent me a text message wanting to know how quick I could send her some thankyou cards, or if she should purchase them.  (As if anyone in my family should be purchasing cards for anything ever again......) In response to that, I made and sent some cards to my mom to send to participants of a recent job interview for her.  I struggled for a little bit thinking of how to make some cards that would be fun, but tasteful in the corporate world.  This is what I came up with:

 I made a box to go with the cards, but I wasn't able to ship it with the cards at a reasonable price to get them there when she needed them, so I still have the box.  My mom's favorite color is red, which is why so much red, and I wanted them to be elegant yet simple given the context for which they were being given out.  The inspiration for this card came from this blog.  She created a very beautiful and simple card.  I stepped it up a notch and added the background medallion stamp (it's one of my favorites from Stampin' Up!).  And here are some close ups of the cards and details:
 Little secret about that ribbon, it is white.  I colored it black using my black Copic Marker as I was in a pinch and the stores were closed.
I hope you enjoyed today's share and feel inspired to have fun and create!

Supplies:  Memory Makers, Stampin' Up! (Cardstock); Stampin Up! Real Red, Tim Holtz Distress Black Soot (Ink); Stampin' Up!  Medallion (Retired), Stampin' Up! Kindness Matters, Stampin' Up!  Because I Care (Retired) (Stamps)

Sunday, June 10, 2012

Baby Card

Today I thought I would share a card I made with you.  This card was made for one of my professors who recently had a baby.  We all chipped in and got her a gift, and I made the card.

I had to admit that I have NEVER made a baby card before....... but I got this brand new stamp set from Stampin' Up! that I just had to have.  The overall card is 8.5x5.5 on the account of over 60 students signing it. Thanks for stopping in!

Supplies:  Pattern Paper (DCWV, unknown); Stamps (Stampin' Up!); Cardstock (Stampin' Up!); Ink (Stampin' Up!, Tim Holtz Distress Ink)

Saturday, March 17, 2012

Saint Patrick's Day Home Decor Banner

I'm terrible of planning ahead.  If you are a follower of my blog, you will notice this terrible character flaw on occasion by the long lapses in postings......  In my efforts to be better at planning, I started planning my Saint Patrick's Day Banner long in advance.  I figured since I missed the boat on the Valentine's Day Banner, I could get an early start on the Saint Patty's Day one.  Even with that intention, I didn't finish this banner until late late last night.  Saint Patrick's Day is big in my house, my husband being a 1/4 Irish (and a very proud 1/4 I might add) insists on it's observance. Which means Corned Beef (which I loathe with a passion) at the least.  Last year, I made some place mats that we use for the month of March.  This year, I thought I would add to my decor by creating a fun little banner.  My original idea had the phrase " Get Lucky" which I immediately dismissed because of its so many varied meanings...... This was immediately replaced with "Got Lucky?" which was no better might I add......I finally decided on the phrase "Got Luck?"  It is more than the Lucky or Luck banners but not so suggestive as the others, or super long.......  It was just right.  And here is the finished product:

So because I am on a "No Buy" challenge I couldn't go and get patterned paper. This left me with a conundrum and a very happy solution. Although I could have justified my purchase. After all it is project specific and I don't own anything Saint Patrick's Day related...... Still I wanted to make do with what I have. So I made my own patterned paper.  No big deal. I used 6 pieces of 8.5x11 white cardstock that I stamped with various Saint Patrick Day Themed Stamps in various colors.  After I got done stamping them, I cut out one pennant shape using my Cricut and SCAL.  I then used this to cut out the rest of my banners.  To get the most out of my paper, each banner measures 5.5x8.5 so that I could get two for each piece of 8.5x11 piece of cardstock.  Additionally, because these are being used as a seasonal home decor, I wanted them large because they will span a wall.
 
I then trimmed my 8.5x11 Pieces of chipboard in half, and traced the pennants onto them.  I then returned to my trimmer and cut out the triangular piece at the bottom.


After I trimmed them, I lined all of the banners in some Shamrock wire trim - you know the stuff you wrap around things and then throw away afterwards.  I had to use my hot glue gun for that part in order for everything to stick down.  And then I cut everything from my cricut using the Paper Doll Dress Up Cartridge.  I backed the hats, and letters with chipboard.  The gold coins you see  in the pots I cut using a 1 inch circle punch on yellow glitter paper.  Seriously I LOVE how it turned out!  This is the finished product:


 And some close ups of the details:

 And a bit of a confession:
So while I was assembling the banner, I got stuck on what to do, hubby suggested that I put the pots of gold behind each letter - which at that time I thought was silly.  and I ultimately decided to use a Nesties Label shape for my backing - which looked AWFUL, just dreadful.  After gluing it all down, I then cut out the pots of gold...... and immediately decided that the letters would look better with pots of gold. Hubby was right.  Ensued was much lifting, and by lifting I mean ripping and tearing, of glued down letters and nesties labels........  So the point of my story is that even old pros like me make awful, dreadful, painful goofs while crafting.

Supplies:  Studio G Stamps; Provo Craft Paper Doll Dress Up Cardtridge; Stampin ' Up! Classic Inks; Bazzill Cardstock; DCWV Glitter Cardstock Stack; 


Saturday, March 3, 2012

A Mixed Media Cover

A while ago I went on a crop retreat with some of my good and dear crafty friends. As part of the retreat we thought it would be fun to have secret sisters. I made lots of cool stuff for my secret sister but the thing that I was really proud of was this:

It's a simple but jazzed up chipboard cover to a Cricut Material Cutting Guide and a Sizzix Sandwich Guide. The cover was fast and easy I haphazardly placed the tissue paper and crinkling it with mod podge. Once that dried I stamped the butterflies using acrylic paint. The Field Notes was stamped in StazOn over white acrylic paint. The brown paint splatters were created using a loaded brush and flinging it to the chipboard.

Supplies:  Tissue Paper from Gift packaging; chipboard; White and Brown Acrylic Paint, Butterfly (Unity Stamp Co); Field Notes (Tattered Angels); Corner Flourish (Fancy Pants);

Friday, February 24, 2012

MAS Recipe Swap and My Cards

I recently joined a Recipe Swap on my swapping site Mini Album Scraps.  This is a huge first for me, I normally don't do these or have any interest in them, but I figured, why not?  I'm a huge cooking fan, I love to cook, and use recipes, so it is important that the cards be functional.  Also, I am a very very messy cook, I do not have a single recipe that is still untouched by food things in my recipe box.  Because of this, I had to think very hard about how I was going to make a pretty card, but have a recipe that was:
1.  Large Enough to Read Easily
2.  Pretty and Functional

While trolling YouTube looking for ideas, I remembered seeing a tutorial over at Split Coast Stampers for a pocket type card - The Criss Cross Card.  And this is what I came up with:


I made my own pattern paper using one of my all time favorite stamp sets by Unity Stamp Co  in four different complimenting colors.  All the color of the papers that I choose to use were matched with those colors.  The one thing that I did do differently was that because I did not want to glue the edges together to make the pocket, I made gussets out of paper and put those on either side of the pocket so that the card could slide in and out nicely.  I did not have to go out and purchase anything special - score for me AND all 5 of these guys were put together in about 3 hours or so.  

I hope you enjoyed!

Supplies:  Bazzill (Cardstock); Stampin' Up! (Cardstock); Prima (Flowers); Bling (Stuiod 18); Stampin' Up! Basic Black, So Saffron, Baja Breeze, Cherry Cobbler, and Old Olive (Ink); Stampin' Up! Four Frames (Stamp); Unity Stamp Co (Stamps); Spellbinders Tab (Diecut); Stampin' Up! (Punch)

Tuesday, February 7, 2012

Gosting Ink Comparison

If you read my last post, you will know that I have been working on my ghosting technique.  I am really enjoying it and its versatility.  It is something that can be dressed up or down, which is just nice to have.  And well it's something new to try out.  In my recent wanderings of the world of ghosting, I have been trying different inks.  The tutorial found here suggests using a waterbased ink.  The first time I did the technique I used my distress inks.  Mainly because I hoard the colors but rarely use them.  After such a great success, I decided that I wanted to use my inks from Stampin' Up! - which I love.  However, despite my love for my Stampin' Up! inks, I was not impressed with the outcome of this technique in tandem with the inks.  The dark colors stained the versamarked portion and the ink did not go on as slick and smoothly as with the distress inks.  Also, I got more a clear distinct line with the Stampin' Up! inks, which I think is attributed to the rather "stiff" nature of the inks.  So, here is a picture of the results side by side:


The left is a pink and the black from Stampin' Up! while the right photo is with Black Soot and Worn Lipstick Distress Ink.  The image done with Distress ink has a more finished, and smooth look while the Stampin' Up! inks have more of a grainy chalky look to them.

One other tip when trying this technique:  Use a rubber brayer.  The first time I did it, I used a nonrubber brayer and it was hard to control the action.  Although the rubber brayer will also slip when doing this technique with distress ink, there is less slippage.  Also, as mentioned previously, this technique is like water on an oily road.  The distress inks on the slick surface of the glossy paper will be slick, so make sure and be ready and use a firm steady motion.

Supplies:  Worn Lipstick, Black Soot (Ranger Distress Ink); Basic Black, Pretty in Pink (Stampin' Up! Classic Ink); Glossy Paper (Ranger Inkssentials); Rubber Brayer; Sexy, Silly, and Sassy Stamp Set (Unity Stamp Co.)

Sunday, February 5, 2012

Cookies, Men, Glossy Cardstock, and Ghosting


Bet you are wondering what cookies, Men, glossy cardstock, and ghosting have a common huh?  Well, after this post, you will know how they are all related.  As some of you know, my dearest and I are about 1000 miles apart one direction while we transition out of the military and into a civilian life.  As that is the case, things can be tough, and I am constantly trying to find ways to let him know I care about him, even if I am too far away to do simple "little" things.  Recently, he has been talking about how he'd like some snickerdoodle cookies.  They are his favorite and by favorite, I mean obsession.  Case in point:

Me: I was thinking of baking something.
Him: Snickerdoodles?
Me:  I was thinking maybe a pie.
Him: Snickerdoodles?
Me: Or how about some chocolate chip cookies?
Him: Snickerdoodles, please?

We have this conversation EVERY time I bake something, which in my house is fairly often.  Cooking is another loved hobby of mine.  About a week ago, I got the idea in my head that it would be fun to bake him some snickerdoodles and FedEx them up to him. But, I could not just simply send the cookies, there HAD to be a card involved.

A while ago, I got the below stamp set from Paper Trey Ink .  It was the best decision ever.  Finding man themed, and good man themed scrap/stamp items, is like finding the perfect fitting pants the second time, or a real life Unicorn.  Talked about, never actually experienced.  Well, I cannot tell you how much I love this set.  It is one of my go-to sets for all things masculine.  With that said, there are still some images from the set that I had yet to use.  One of which is that lovely Koi you see in the bottom left of the image.

Related to this is the fact that I have been trying to expand my stamping repertoire.  Which is related to something else entirely unrelated to this post.  None the less, in my efforts to expand my card and scrapbooking repertoire, I decided that I wanted to try an awesome technique.  Ghosting.  Yep, that's right.  Ghosting.  This is where you take Glossy Cardstock and Versamark ink, stamp your image in versamark onto the glossy paper and then brayer over the paper with ink.  A complete how-to can be found here

So, armed with cookies, glossy cardstock, a new technique, and a masculine themed stamp,  I came up with this:

Supplies:  Gloss Paper (Ranger Inkssentials); Versamark (Tsukineko); Faded Jeans Distress Ink, Concord Grape Distress Ink, Pine Needles Distress Ink (Ranger); Masculine Motifs (Paper Trey Ink); All Year Cheer II (Stampin' Up!); Bazzill Cardstock; Rubber Brayer; Brown Cross Stitch Floss

And this:

Supplies: Gloss Paper (Ranger Inkssentials); Versamark (Tsukineko); Faded Jeans,Pine Needle, Antique Linen, Milled Lavender Distress Ink (Ranger); Masculine Motifs (Paper Trey Ink); Archival Ink (Ranger); White Pigment Ink (Colorbox); Brown cross stitch floss; Bazzill Cardstock

And let me tell you I LOVE them.  After making these cards, I seriously wish that I had more males in my family.  It is masculine and beautiful, things that men like very much.  Masculine beauty.  It is a thing of beauty for me.