Friday, September 27, 2013

Layout: After Snowfall

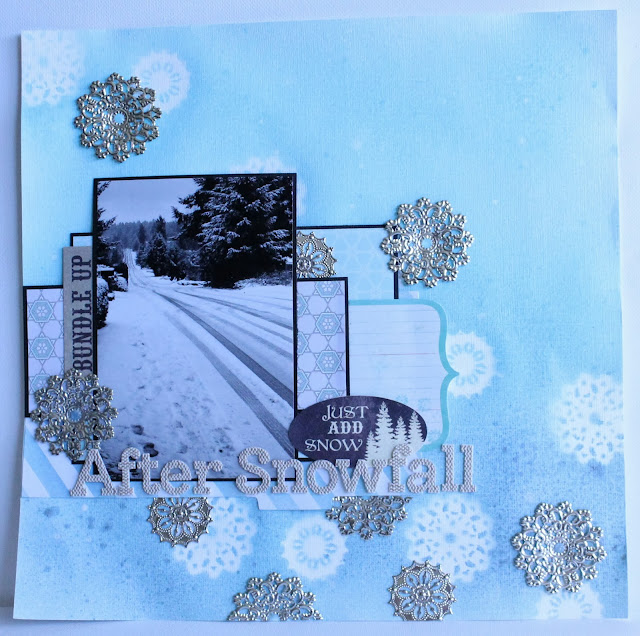
Hello!  Today I want to share with you a layout that I created incorporating some beautiful metal pieces I ordered a while back.  When my order of lush metal arrived, I showed my husband and he said "Hey! Those look like Snowflakes, I bet you could use them like snowflakes on a layout."  So, I have to say that my darling husband helped me find the inspiration for this awesome layout.  And here is the layout:


You cannot see it well in this particular photo (I am not sure why this photo looks a little dark), but the background has an ombre/gradient effect with the top portion being a light blue and the bottom third being a steely blue.  I got this by placing the metal upside down on a piece of plain white cardstock.  I then sprayed the top portion with a light blue glimmer mist (Patina), took the sprayer from the Patina bottle and placed it in my bottle of Twilight glimmer mist (because the sprayer on the twilight is plugged) and sprayed the bottom portion with the Twilight glimmer mist.  Although switching the sprayers was very irritating, I think it turned out really well.  Once the background was dry, I took the metal pieces off and flipped them over and used them as an additional layer of snow flakes to create a foreground/background look.  In order to add the mood and feeling of a snow day, I matted the pattern paper and photo in black cardstock.  And here are some close ups (with a more true color as well):

I hope you have enjoyed my share today.  If you like the metal, pop on over to my friend's shop and splendor in all of her beautiful metal for crafty projects.  http://www.zibbet.com/ButterBeeScraps

Supplies:  (Cardstock) Bazzill Basics White, Bazzill Basics Raven; (Pattern Paper) Stampin' Up! Winter Frost Designer Paper Stack, Heidi Swapp Album Tabs; (Embellishments) Echo Park, My Mind's Eye, Silver Filligree Embellishment #167S-P, Silger Filligree Embellishment #286-P; (Letters) Little Yellow Bicycle; (Ink) Tattered Angels Glimmer Mist Patina, Tattered Angels Glimmer Mist Twilight, Studio Calico Mister Heuy's Opaque White

Wednesday, September 4, 2013

Hello

Popping in for a quick share.  The layout I am sharing with you today I created in response to a challenge over at Scrapjazz.com.  I unfortunately cannot remember which Challenge it was, but I believe it was a Challenge of the Week.  All I remember is that I was required to use some felt and I pulled out the Prima die cut felt stickers that I had to have when they came out, hoarded, and then had no idea how to use them or what to do with them...... Based on the challenge (which I cannot remember what it entailed), this is what I came up with:

(Supplies): Prima Ledger, Glitz Desgins Pretty in Pink (Pattern Paper); Teresa Collins, Unity Stamp Company Ledger (Stamps); American Crafts (Rub Ons); Prima, My Mind's Eye, Pink Paislee, Basic Grey (Embellishments); Fiskars (Paper Punch)

Monday, September 2, 2013

Pink Paislee Nantucket and Want2SCrap Ocean Album

I just wanted to pop in and share a mini album that I recently created.  Recently I was able to upgrade my printer and purchase a large format printer which also brought the added benefit of adding to my scrapbooking paper addiction.  This large format printer opened up the wonderful world of digital paper.  In celebration of this, I purchased the now retired Pink Paislee Nantucket paper collection.  To this day, I am absolutely in love with this paper line, so I created a mini album out of it!  Let me warn you this is a photo heavy post.  I will try and not bore you with much more writing either!

If you are interested in purchasing this mini album, you can find it on my Etsy:
https://www.etsy.com/shop/ThePeanutButterShop?ref=si_shop


Because I am selling this little big bad guy on Etsy, I left the front cover blank so that a custom title can be created.  The sign was created by cutting out a wood sign with my cricut and cutting apart the wood sign then reassembling.  I covered the paper in Picket Fence Distress Ink and then stamped the pieces of the wood sign with a wood grain stamp (from Stampin' Up!) and then ran more Picket Fence Distress Stain over the top of it.  Voila, instant weathered wood beach sign.  The netting that you see throughout the album is Cheese cloth which I colored using the Coffee Dye technique (first time EVER doing that).  The tags throughout the mini album were also coffee stained


I Have to pop in to say that the awesome and cute little stamps you are seeing of the sea life - those are from Stampin' Up! and Unity Stamp Company.  Apparently, I have a love of all things sea related.  In case you are wondering about my snapshot stamp - I purchased the images off of a nice lady on Etsy who customized the images to indicate various photo sizes undearneath the camera image.  I then had the proofs sent to a nice gentleman on Etsy who translated the images into red rubber.  

You can find the nice lady at this link (RhodaDesignStudio):

And the nice gentleman (2Impress Stamps) at this link:


I have to say that my most loved page of this mini album is the coral page because of the way the netting and pearls came out.  Prior to adding these wonderful embellies it was my least favorite page (it was such a pain to file the paper down and fit it to the shape).  However, after adding the beautiful little details, it is my favorite.  Okay the seahorse may have helped as well.....


And here are some close ups of the details of some of the pages.

 The anchor, postage stamps, snorkel, sand castle, and adorable little sea horse were all created using dies from Lifestyle Crafts/Quickutz and Cuttlebue (okay on the postage stamp which came with my Cuttlebug and I have held onto).

Thanks for stopping by and have a art inspired day! 


Airport Romance

Hello,  back again with another quick share.  I created the layout below a little while back, I am not sure of the inspiration behind the layout or what prompted me to create it, however, it is still a super fun layout.  So, here it is:

Supplies:  Prima Ledger, Glitz Designs Pretty in Pink (Pattern Paper); American Crafts Thickers, Jilly Bean Soup Alpha Stickers, Prima Flower, Pink Paislee Brad, Stampin' Up! Paper Clip (Embellishments)
 
Although you cannot see it, these are some smaller photos of me and my hubby hanging out at the airport waiting to board a plane to Korea.  We spent a long time traveling to and fro without one another, so every time we travel together I make it a point to take photos and document the fact that we are traveling with one another and not in parting from one another.